
Hi,
This article is the direct continuation of this article : Contours - 1: Getting Started
1 - Image Moments
The function cv2.moments() gives a dictionary of moment values calculated. See below :
If you print moments, you get a dictionary:
Now you can have calculations using these dictionary keys. For example to find the area of the object:
More we will learn in next article.
2 - Contour Area:
3 - Contour Perimeter:
It is also called arc length. It can be found out using cv2.arcLength() function.
4 - Contour Approximation :

5 - Convex Hull :

Syntax :
So to get a convex hull as in above image, following is sufficient.
For example, execute the following :
6 - Is contour Convex:
7 - Bounding Rectangle :
(x,y) - center point of the box
(w,h) - width and height of the box
theta - angle of rotation
Area of normal bounding rect = 15972
Area of rotated rect = 8853
8 - Minimum Enclosing Circle :
You can see the result in this image.
9 - Fit Ellipse :
Next one is to fit an ellipse to an object. It returns the rotated rectangle in which the ellipse is inscribed.
------------------------------------------------------------------------------------------------------------
So, these are some major functions related to Contours.
There are some other functions like, cv2.pointPolygonTest(), cv2.convexityDefects() etc which we will deal in another article.
Hope you like this,
Regards,
ARK
This article is the direct continuation of this article : Contours - 1: Getting Started
In this article, we will learn usage of several functions closely related to Contours. Once this functions are learnt, we can find almost all features of Contours.
1 - Image Moments
Image moments help you to calculate some features like center of mass of the object, area of the object etc. Check out the wikipedia page : http://en.wikipedia.org/wiki/Image_moment
The function cv2.moments() gives a dictionary of moment values calculated. See below :
moments = cv2.moments(cnt)
If you print moments, you get a dictionary:
{'mu02': 10888082.359906793, 'mu03': 0.005234025965704581, 'm11': 368666693.125,
'nu02': 0.10815497152071127, 'm12': 69763579350.98334, 'mu21': 101313.30416250229, 'mu20': 6674463.831166983,
'nu20': 0.06629968636479547, 'm30': 84692116672.95001, 'nu21': 1.0046975468372928e-05, 'mu11': -1980114.5675549507,
'mu12': -33122544.260385513, 'nu11': -0.019669141689288665, 'nu12': -0.0032846761082870463, 'm02': 352044973.5833333,
'm03': 68983799276.15001, 'm00': 10033.5, 'm01': 1850134.5, 'mu30': 8633090.369003296, 'nu30': 0.0008561209988226333,
'm10': 2010061.8333333333, 'm20': 409360323.5833333, 'm21': 74691021944.88333}
Now you can have calculations using these dictionary keys. For example to find the area of the object:
area = moments['m00']
More we will learn in next article.
2 - Contour Area:
Area of contour is same as number of pixels inside the contour. It can be found out using cv2.contourArea() function.
area = cv2.contourArea(cnt)
3 - Contour Perimeter:
It is also called arc length. It can be found out using cv2.arcLength() function.
perimeter = cv2.arcLength(cnt,True)
4 - Contour Approximation :
Contour Approximation will remove small curves, there by approximating the contour more to straight line. This is done using cv2.approxPolyDP() function.

To understand this, suppose you are trying to find a square in an image, but due to some problems in the image, you got only what is shown at right side.
So when you try to find the contours, you will get all the curves also. But with contour approximation, you can avoid all those problems and approximates it to a perfect square.
Check below image. Red region is the actual contour area. Where green line shows approximated contour. You can see, approximated contour is a perfect rectangle.
approx = cv2.approxPolyDP(cnt,0.1*cv2.arcLength(cnt,True),True)
 |
| approximation epsilon = 10% of arc length |
It also reduces number of points to operate. In original contour, there was 210 points, while approximated contour has only four points which corresponds to four corners of rectangle.
In this, second argument is called epsilon, which is maximum distance from contour to approximated contour. It is an accuracy parameter. In above case, i have taken it as 10% of arc length.
 |
| approximation epsilon = 1% of arc length |
What will happen if you take it as 1% of arc length? Check out this left image. Approximation detects the defects also. And number of points in approximated contour is now 22.
So a wise selection of epsilon is needed and it all depends on your application.
5 - Convex Hull :
 |
| convex hull |
Once the approximation is over, Convex Hull is next. This will look similar to contour approximation, but not. Here, cv2.convexHull() function checks a curve for convexity defects and corrects it. Generally speaking, convex curves are the curves which are always bulged out, or at-least flat. And if it is bulged inside, it is called convexity defects. For example, in above case, we can see there are some inside curves for that square. They are the convexity defects. If we find convex hull for this, we get image at right.
(Actually this image is same as above, because both results are same. But it doesn't mean approximation is convex hull, although a contour can be approximated to get a convex hull by selecting suitable epsilon)
Still for those who didn't understand convex hull, OpenCV documentation has a nice picture which demonstrats convex hull and convexity defects. As you can see, the black curve ( hand ) is the original contour. Red curve surrounding it is the convex hull, and convexity defects are marked at gaps between fingers, which are the local maximum deviations of hull from contours.
hull = cv2.convexHull(points[, hull[, clockwise[, returnPoints]]])
Points are the contours we pass in to.
Hull is the output, normally we avoid it.
Direction : Orientation flag. If it is true, the output convex hull is oriented clockwise. Otherwise, it is oriented counter-clockwise. (Actually i haven't used this flag anywhere)
So to get a convex hull as in above image, following is sufficient.
hull = cv2.convexHull(cnt)
If we print hull, we get a list: [[[234 202]], [[ 51 202]], [[ 51 79]], [[234 79]]], where each value denotes the corners of rectangle, actually coordinates of corners of rectangle.
To draw a convex hull, you need to do as shown above.
But there is a fourth argument, returnPoints, which is by default True. Then it returns the coordinates. But if it is False, it return the indices of those of convex hull points with respect to contours.
For example, execute the following :
hull = cv2.convexHull(cnt,returnPoints = False)
Now if we print hull, we get : [[129],[ 67],[ 0],[142]]. If you check corresponding values in cnt, it will be same as coordinates we have already found. for example, cnt[129] = [[234, 202]] and so others.
But why would we need such a feature ? It is necessary when we find the convexity defects. We need to pass these indices to cv2.convexityDefects() function to find convexity defects. We will deal with it in another article, but keep this in mind.
6 - Is contour Convex:
There is a function to check if a curve is convex or not, cv2.isContourConvex(). It just return whether True or False. Not a big deal.
k = cv2.isContourConvex(cnt)
7 - Bounding Rectangle :
There are two types of bounding rectangles.
1) Just an upright bounding rectangle which covers the full object. It doesn't consider the rotation of the object.
Let (x,y) be the starting coordinate of rectangle, (w,h) be its width and height.
Then we can find and draw the bounding rect as follows (Green color). See result below:
x,y,w,h = cv2.boundingRect(cnt)
cv2.rectangle(im,(x,y),(x+w,y+h),(0,255,0),2)
2) Rotated rectangle where a bounding rectangle is drawn with minimum area, so it considers the rotation also. The function used is cv2.minAreaRect(). It returns a Box2D structure - (x,y),(w,h),theta.
rect = cv2.minAreaRect(cnt)
box = cv2.cv.BoxPoints(rect)
box = np.int0(box)
cv2.drawContours(im,[box],0,(0,0,255),2)
(x,y) - center point of the box
(w,h) - width and height of the box
theta - angle of rotation
 |
| Bounding rectangle |
But to draw rectangles, we need coordinate points. For this cv2.cv.BoxPoints() function is used.
Both the rectangles are shown in a single image. Green rectangle shows the normal bounding rect. Red rectangle is the rotated rect.
Area of normal bounding rect = 15972
Area of rotated rect = 8853
 |
| CircumCircle |
Next we find the circumcircle of an object using the function cv2.minEnclosingCircle(). It is a circle which completely covers the object with minimum area.
You can see the result in this image.
(x,y),radius = cv2.minEnclosingCircle(cnt)
center = (int(x),int(y))
radius = int(radius)
cv2.circle(im,center,radius,(0,255,0),2)
9 - Fit Ellipse :
Next one is to fit an ellipse to an object. It returns the rotated rectangle in which the ellipse is inscribed.
ellipse = cv2.fitEllipse(cnt)
cv2.ellipse(im,ellipse,(0,255,0),2)
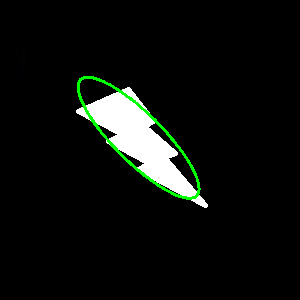 |
| Fit ellipse |
------------------------------------------------------------------------------------------------------------
So, these are some major functions related to Contours.
There are some other functions like, cv2.pointPolygonTest(), cv2.convexityDefects() etc which we will deal in another article.
Hope you like this,
Regards,
ARK
Very good content, thanks for that.
ReplyDeletethis whole tutorial is just wonderful, many thanks!!:)
ReplyDeleteI'm new to Python + OpenCV. I have two questions:
1. how to find the two points on one contour, which defines the diameter of the minimum enclosing circle of the contour?
2. say we have a line crosses a contour and they have 2 cross points, how could I get these two points? I mean position of these points.
Thank you so much for your great tutorials!
ReplyDeleteYou saved me from a lot of painful experiences (which I had with the documentation previously)!
You may have mentioned it, but can you explicitly explain how to select for or exclude objects of particular sizes? Thanks-a-bunch.
ReplyDeletetry a for loop, for example, i want to draw all contours having size equal to 100, then :
Deletefor cnt in contours:
area = cv2.contourArea(cnt)
if area == 100 :
cv2.drawContours(img,[cnt],0,....)
----- or whatever you want-------
Now above code draw only contours with area = 100. Others are neglected.
Hi, for a empty parking lot, parking spaces is separated by white lines, ground is black. How can I know how many parking spaces are there?
ReplyDeleteThanks!
Nice post man, thanx :)
ReplyDeletedim
Thanks for the easy to understand tutorials.
ReplyDeleteI am trying to do a blurring of an elliptical shape. Currently I do the folllowing:
1. Gaussian blur of the rotatedrect that bounds the ellipse
2. Compare if each pixel of the rect is inside the ellipse and if it does, copy the blurred pixel over to the main image.
However this is taking a long processing time. Do you have any better way of doing this? Thanks.
You will be using for loop. It will take long time. Always try to avoid for loops in numpy. I think you can create a mask of that ellipse, cut that region using cv2.bitwise_and, then smooth it, then place it back. Try it. I am not sure.
Deletecan't find anywhere what are the range for rotation angle (theta) and is it clockwise or counterclockwise? I wish opencv python binding Docs was better.
ReplyDelete